Information:
- You can only scan documents classified up to red data. For more information about storage and processing of data at UiO, see the information here.
- Your scanned documents will only be stored for 7 days; after this, the folder and your documents will be deleted. Therefore, copy the documents you need after you have scanned them.
- Access to the documents is only available from the UiO network, either via UiO Programkiosk, VPN or wired network. See the guides below for how to get access.
Quick guide
- Scan your documents on the printer
- Log in to the printer.
- Select Scan, then select Scan to folder as the method.
- Then start scanning your documents.
- Completed scan
- When the scanning of your documents is completed, you will receive an email.
- The email contains information about where you can find your scanned documents.
- Retrieve your documents
- When you have received the email that the scanning is completed, you can retrieve your documents.
- For students:
- Find and retrieve your scanned documents via Kontor Fullskjerm in UiO Programkiosk.
- For staff:
- For Windows you can find your scanned documents by going to the network folder called \\dokskann.uio.no\fil.
- For Mac you can find your documents by connecting to the network folder called smb://dokskann.uio.no/fil.
- Copy your documents
- When you have connected to the folder where your scanned documents are located, make sure to copy the documents you need to your computer. They will be deleted after 7 days.
How to scan to folder
For more information on how to use the printer and log in, see the guides here.
- Log in to the printer
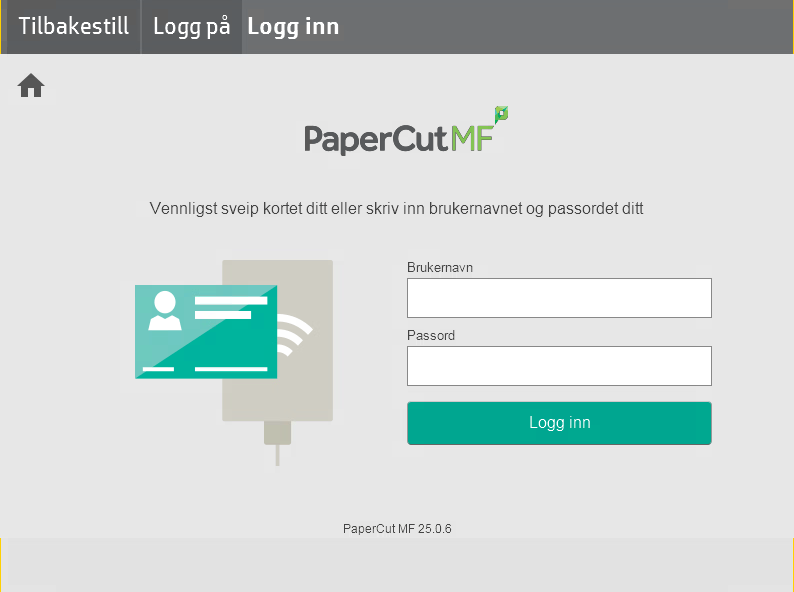
- Log in to the printer by tapping your card or by entering your UiO username and password.
- A guide for how to log in to the printer is linked further up.
- Select function
- When you have logged in to the printer, select the function called Scan.

- Select method
- When you have selected the function for scanning, choose which method you want to scan with.
- Press Scan to folder.

- Prepare documents
- Place the documents you want to scan either in the feeder tray or on the scanner glass on the printer.
- Set defined options
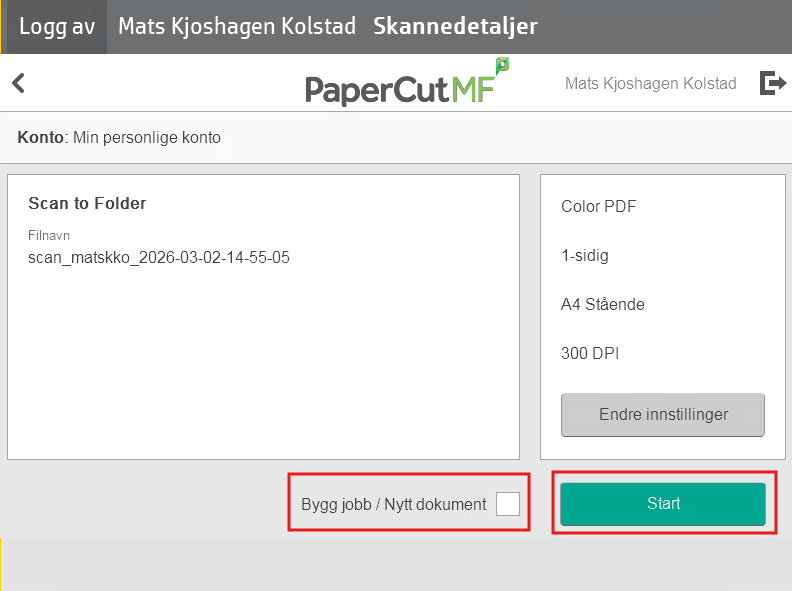
- If you want to change the quality of the scan, select Change settings and make your choices.
- If you want to build the scan by scanning several documents, check Build job / New document.
- Start the scan
- When you have prepared the documents and made the desired choices, you can start the scan.
- Press Start to start scanning to folder.
- The scan starts
- When the scan has started you will see this on the screen. The printer will notify you when the scan is finished.
- If you have checked Build job / new document, you will be able to scan more documents. When you are finished scanning, press Done and the scan will be sent to your folder.
- You will also receive an email when your documents are ready and the scanning job is completed.

How to find/retrieve scanned documents
When you have completed the scanning of documents, you will receive an email that your documents are ready. The email contains information about where your document has been stored. There are several ways to access your scanned documents.
View scanned documents in UiO Programkiosk (Students and staff)
The easiest way for most people to find and retrieve the documents is to use UiO Programkiosk / view.uio.no. This is aimed at everyone, both staff and students.
More information and guides for using UiO Programkiosk can be found here.
Guide:
- Log in to UiO Programkiosk
- Start by logging in to UiO Programkiosk. Either via a web browser by going to view.uio.no or by connecting to view.uio.no from Omnissa Horizon Client on your computer.

- Start Kontor Fullskjerm
- When you are logged in to UiO Programkiosk, you must connect to a machine, for example Kontor Fullskjerm.
- Find Kontor Fullskjerm and double-click to start the machine.

- Open Windows File Explorer
- Open Windows File Explorer from the taskbar or from the Start menu.

- Navigate to the folder
- When you have opened Windows File Explorer, you must navigate to the folder where the scanned documents are located.
- Click on the address bar/search field at the top of Windows File Explorer, then type \\dokskann.uio.no\fil\<your-UiO-username>.
- Replace <your-UiO-username> with your actual username at UiO, then press the Enter key to go to the folder.

- Find documents
- When you have navigated to the folder, you will see your scanned documents in the folder.
- You can either use Kontor Fullskjerm to open/edit the scanned documents, or copy them to your own computer for further work.

- Copy documents to your local computer
- If desired, you can copy the documents to your own computer.
- Drag the documents you want to copy over to the drive that has been added from Kontor Fullskjerm. You will find connected drives in the menu on the left in Windows File Explorer.
- For guides and use of UiO Programkiosk, see the link referred to further up in the guide.

View scanned documents directly on your Windows computer (Staff)
If you want to find and retrieve your scanned documents directly from your Windows computer (UiO-managed), you must ensure that the computer is connected either to the UiO wired network (Office) or connected via VPN. This is intended for staff; students must use UiO Programkiosk for access.
Guide:
- Connect to VPN or UiO network
- To get direct access to your scanned documents from your computer, you must be connected to the UiO network, either through VPN or wired network.
- Therefore, make sure that you are connected to the UiO network.

- Open File Explorer
- Open Windows File Explorer from the taskbar or from the Start menu.

- Navigate to the folder
- When you have opened Windows File Explorer, you must navigate to the folder where the scanned documents are located.
- Click on the address bar/search field at the top of Windows File Explorer, then type \\dokskann.uio.no\fil\<your-UiO-username>.
- Replace <your-UiO-username> with your actual username at UiO, then press the Enter key to go to the folder.

- Find documents
- When you have navigated to the folder, you will see your scanned documents in the folder.
- Copy any documents you want over to your local computer.

View scanned documents directly on your Mac computer (Staff)
If you want to find and retrieve your scanned documents directly from your Mac computer (UiO-managed), you must ensure that the computer is connected either to the UiO wired network (Office) or connected via VPN. This is intended for staff; students must use UiO Programkiosk for access.
Guide:
- Connect to VPN or UiO network
- To get direct access to your scanned documents from your computer, you must be connected to the UiO network, either through VPN or wired network.
- Therefore, make sure that you are connected to the UiO network.

- Open Finder
- Open Finder on your Mac computer.

- Navigate to the folder
- In the menu bar at the top of Finder, click Go, then select Connect to Server.

- Connect to server
- In the address field, enter smb://dokskann.uio.no/fil/<your-UiO-username>.
- Replace <your-UiO-username> with your actual username at UiO.
- Then click Connect.

- Authenticate yourself
- You may see a dialog asking for a username and password.
- Select Registered user, then enter your UiO username and password, and click Connect.

- Find documents
- When you have navigated to the folder, you will see your scanned documents in the folder.
- Copy any documents you want over to your local computer.
