Educloud Data Portal
You can use the dataportal to import and export data in Educloud.
Import data
Import the files
- Go to data.educloud.no
- Select Import files
- Log in with your Educloud credentials
- Select the project you want to import the data to
- Click on Browse and select the files you want to import
- On group you can select the group that should have access to the file
- Click Import when you have selected all the files you want to import
Locate and find the imported data
- Log in to an Educloud machine (via the Horizon client or https://view.educloud.no/ in a web browser) with Educloud credentials
- Open File Explorer
- Click on This PC on the left side
- Under Network Locations, select the project you imported the data to
- Open the folder System > file-import > ecxx-member-group
Export data
Note that you need permission from the project administrator to export files.
Select the files you want to export
- Log in to an Educloud machine (via the Horizon client or https://view.educloud.no/ in a web browser) with Educloud credentials
- Open File Explorer
- Click on This PC on the left side
- Under Network Locations, select the project you want to export data from
- Drag the files you want to export into System > file-export
Get the exported data
- Go to data.educloud.no
- Select Export files
- Log in with your Educloud credentials
- Select the project you want to export data from
- Click on the filename to download the files you want
Educloud Share
It is possible to share data by uploading it to the cloud service Educloud Share. This is only permitted for green data, since the service can share data with anyone by any user in the project (if they share an access link). More information on how to use this service can be found here.
Nettskjema & Diktafon
Educloud projects are connected to the internet by default, which allows you to download data from Nettskjema and Diktafon directly into Educloud Research. See the guide below for more information.
Importing data from Nettskjema to Educloud
Note that the methods under are only alternatives and therefore not something that is recommended to use. We encourage you to use one of the methods above.
Other alternatives
Drag and drop with VMware Horizon Client
Use this method with red data only if your computer is red data certified.
If you use the VMware Horizon Client when accessing your Educloud project desktop, you can simply drag the files from your computer and into the VMware Horizon Client. This works for both Windows and Linux desktops, and is the easiest solution for importing data into Educloud.
WinSCP
If you are working on a Windows desktop you can transfer files via WinSCP. Say you want to import files from your UiO home directory into Educloud.
- Log in to an Educloud Windows desktop (usually through the VMWare Horizon client) with your Educloud credentials.
- Once inside the desktop, search for and open WinSCP from the Start menu.
- In the Login window that pops up, fill in hostname login.uio.no, as well as your usual UiO username and password. This is to connect to a UiO server.

- Now you will find yourself in the WinSCP window, which mainly consists of two boxes that each opens up to a directory between which you can transfer files. In the right box you can see your UiO home directory.
- Next, you need to open the right directory in Educloud. In the toolbar on top of the WinSCP window, click the Open folder icon.
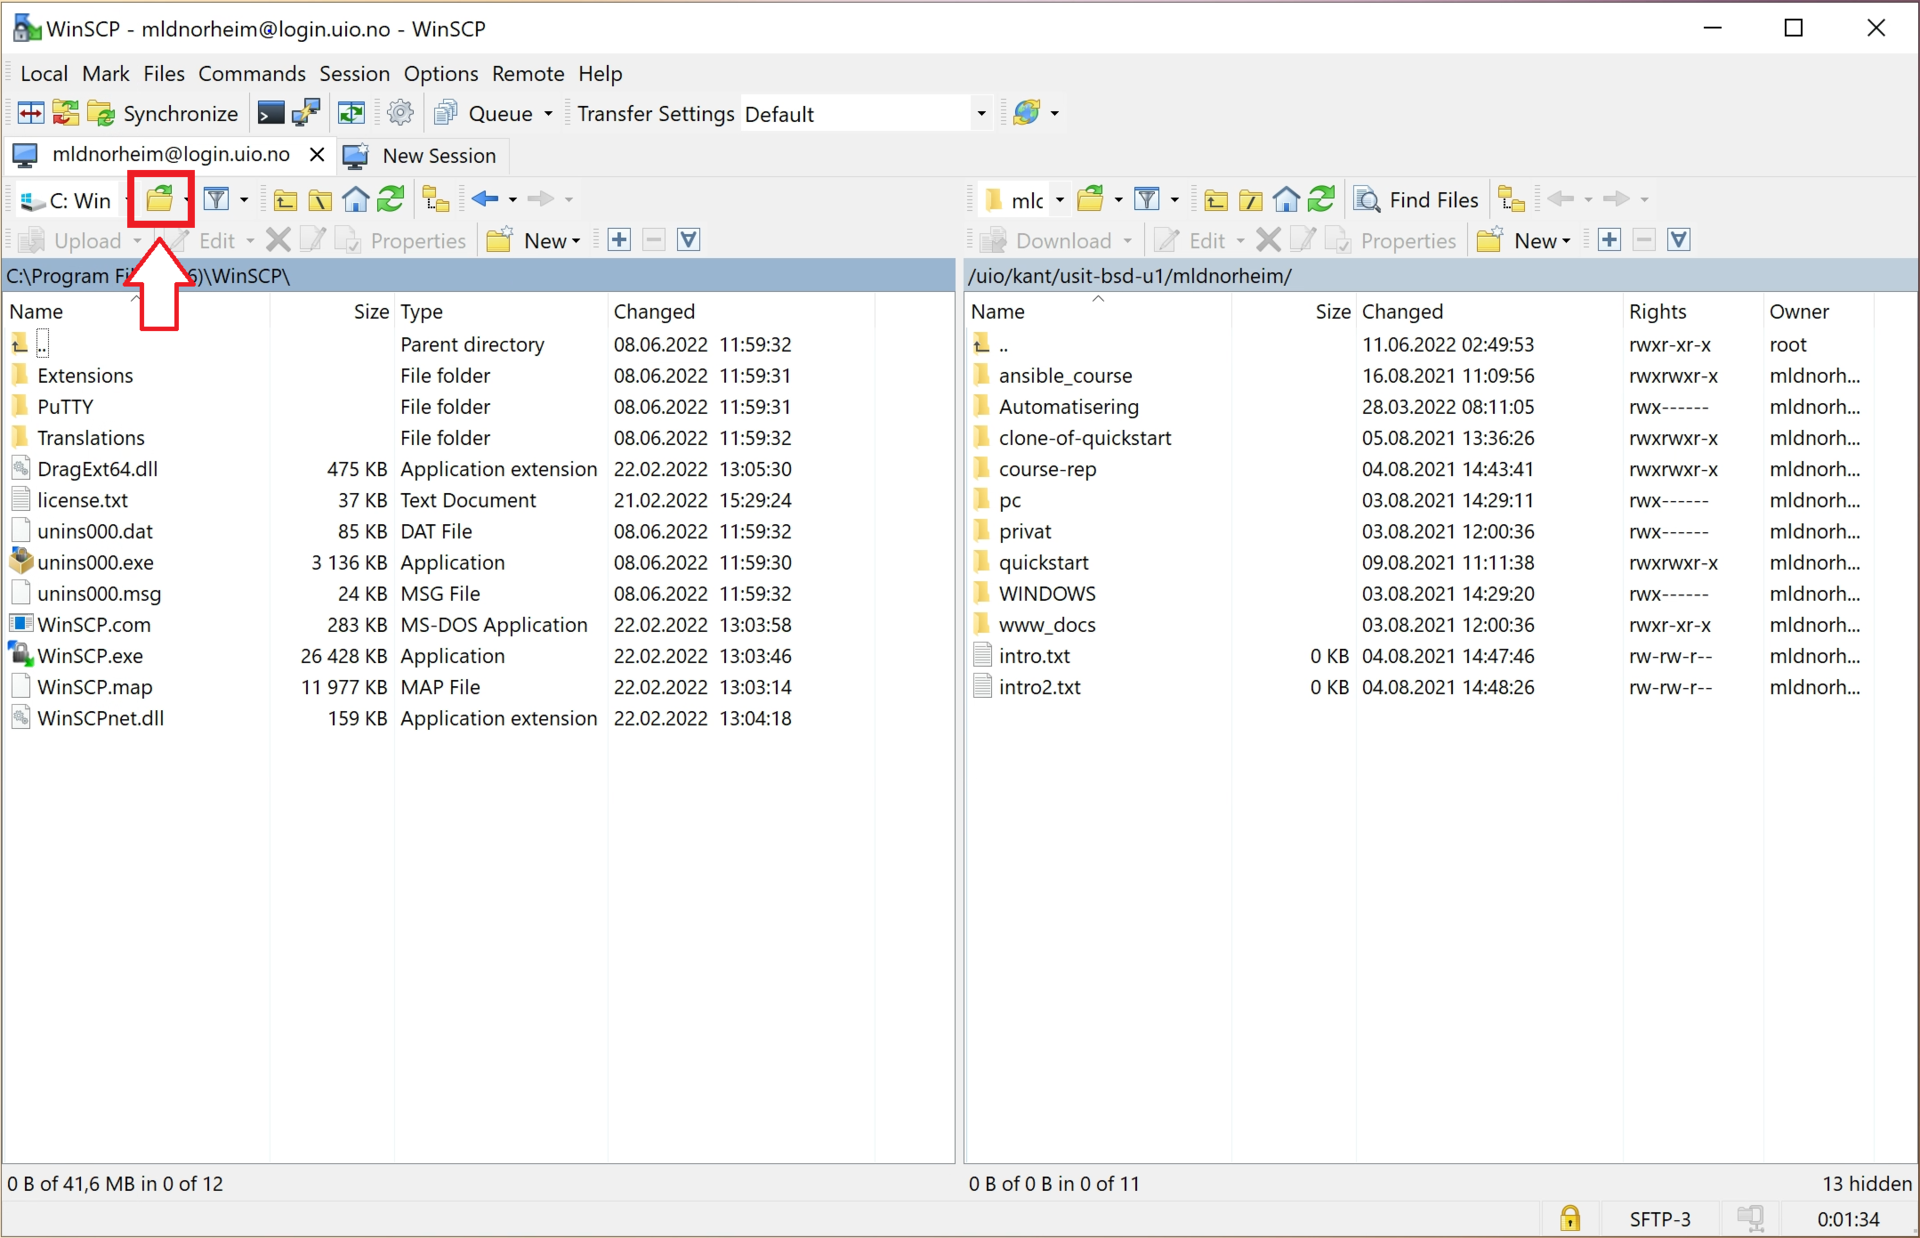
- To locate your Educloud project folders, you need to go via Aspasia. In the Open directory field, write \\aspasia\ecXX (where "XX" is swapped for the desired project number). Then click OK.

- IMPORTANT: unless you go through Aspasia, you will not be able to Browse... and find the project folders.
- Now the left box in the WinSCP window will show the inside of the project folder for ecXX. You are ready to transfer files!

- Right-click if you wish to create a new folder or file directly in one of the directories
- To copy files from one directory to another, you can simply drag and drop.
- Changes/transfers will take effect immediately.
Command-line client (tacl)
Tacl is a resumable solution which is well suited for large files.
pip3 install tsd-api-client
tacl --register
You will be prompted for an API environment:
1 - for normal production usage
2 - for use over fx03 network
3 - for testing
4 - for Educloud normal production usage
5 - for Educloud testing
 >
Choose the option that fits your needs by typing corresponding the number and then Enter. If you are not sure, it is likely option "4". You will be prompted for your Educloud username, password, a One-Time Code and your Educloud project code. (See these instructions for setting up 2-factor authentication on Educloud. If you do not know your project code, use the default code ec12.)
username > ec-password > one time code > ec project > GET: https://api.fp.educloud.no/v1/ec12/auth/iam/api_key updating ec12 Successfully registered for ec12, and API environment hosted at https://api.fp.educloud.no/v1
You are now ready to start using the tsd-file-api client. You can see a list of help guide topics with:
tacl --guide topics
You can use the same command to see instructions on a particular topic, for example:
tacl --guide uploads
FileSender (for UiO users only)
- Go to FileSender at UiO
- Click Feide
- Log in with UiO username and password
- First-time login will require consent to share data from Feide with FileSender. Click Yes, Continue
- Drag&Drop files into the grey area on top, or click Select files
- Select the file(s) you want to send and click Open
- On the left-hand side enter the recipient e-mail. This can be your own e-mail
- There are optional subject and message fields. Use if needed
- On the right-hand side you can set an expiry date for the FileSender link. Click the date to bring up a calendar. Select your preferred expiry date
- Click Send. The upload start
- Pause will halt the upload
- Stop will terminate the upload
- FileSender notifies you when the upload is done. Click Close
- Files are automatically sent when upload is done
Call us
Opening hours are weekdays from 08:30 to 17:00 and Saturdays from 10:00 to 15:00.
Phone number: 22 84 00 04
Book a Zoom meeting
Students and employees can book a Zoom meeting with UiO Helpdesk. Available hours are Tuesday to Thursday between 11:00 and 13:00.
Book a video call