NB! If you're experiencing problems with connecting to the Exchange mail-server, you can turn on offline-mode from the Send / Receive pane, as shown in the picture below.
Export local data to a PST file
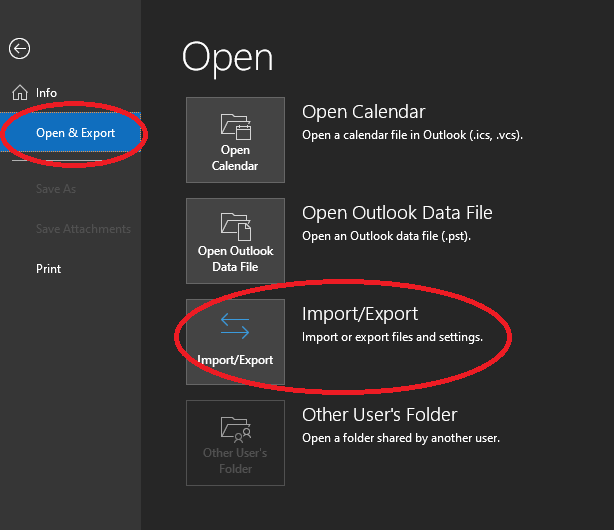
- Click on File, and then first on Open & Export, then on Import/Export.
- Choose Export to a file, and click on Next.

- Choose Outlook Data File (.pst), and click on Next.

- Here you get to choose what you would like to backup. You can chose an individual folder (such as Inbox), or all the data under your email (as shown in the picture). Remember to tick on Include subfolders so that all folders within your chosen one are included in the backup.

- Click on Browse to give a name to your PST file, and chose where it should be saved to. After that, chose one of the 3 options (you'll have the same choice later when you import, so here you can choose either 1 or 2), and click on Finish.

- Finally a window will show up asking you to create a password. It's highly recommended to create a password, but you must remember it, otherwise your file will be locked permanently. If you do not wish to create a password, you can leave the boxes empty and click on OK.

Depending on the size of your offline-data, it might take some time. You won't get any notification that it's finished, but you can navigate to the folder you chose under point 5 and see your file (there should only be one file with the given name, such as mypstbackup.pst).
Import data from a PST file
- Click on File, and then first on Open & Export, then on Import / Export.
- Choose Import from another program or file, and click on Next.

- Choose Outlook Data FIle (.pst), and click on Next.

- Click on Browse to navigate to the folder in which you have your PST file and choose it. You'll now have 3 choices:
- Replace duplicates with items imported: Choose this if you want the data in the imported PST file to overwrite duplicate items in your current PST file. Choose this ONLY if you're certain that you're imported PST file has more updated/newer data than your current one. If not, choose one of the remaining 2.
- Allow duplicates to be created: If you choose this, all data from the imported PST file will be added, including duplicate emails. This is the safest option, but would require cleanup afterwards if you have many duplicates.
- Do not import duplicates: Choose this if you only wish to import new/non-duplicate emails. Preferred option if you know the imported PST file only has older data. If you (after checking) find out that you're missing emails from the imported PST file, you can import it again and choose the previous option.

- You'll now see a preview of the imported PST file's contents. Here you must choose where to import them to, and if you'd like to include subfolders as well.
- Import items into the current folder: A new subfolder will be created within the folder you've marked (see the red line in the picture), in which data from the imported PST file will be saved.
- In the picture, the Import-backup folder was created under the email (right-click on the email, then choose New folder), which had been opened/marked before the import process was initiated (step 1).
- Import items into the same folder: The imported data from the PST file will be merged with the current data (your choice from step 4 - decides how) under the chosen email/folder fro the drop-down list.

- Import items into the current folder: A new subfolder will be created within the folder you've marked (see the red line in the picture), in which data from the imported PST file will be saved.
- Finally, click on Finish. Depending on the size of your imported PST file it might take some time to complete the import. Once it's done, you can browse your folders and check that the import was successful.
Did you find what you were looking for?
Search the user manual